
Understanding the Design
Maison Margiela’s “REPLICA” fragrance line features a unique, minimalist bottle design inspired by classic apothecary jars. Crucially, the standard 100ml and 300ml bottles do not have a separate, removable cap covering the spray nozzle.
Instead, the design features a protective metal cap that is integrated with the spray mechanism itself. You must remove the entire metal housing to access the perfume or atomize the fragrance.
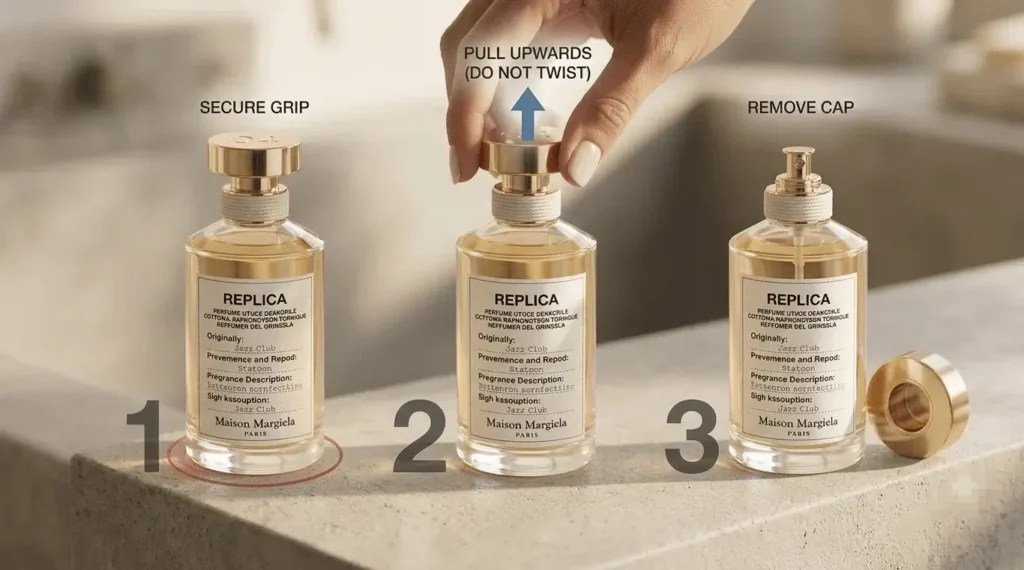
Here is a visual guide to the structure and the proper removal technique.
1. The Product Itself: The Maison Margiela REPLICA Bottle
Before you attempt to open the bottle, it is essential to understand its anatomy. This initial visualization shows the pristine, standard 100ml Maison Margiela REPLICA bottle (specifically, the “Jazz Club” fragrance).
Note that the neck is wrapped in textured white cotton rope, and the top features a polished, cylindrical gold cap with the Maison Margiela numeral logo engraved on the flat top. This entire gold piece is what needs to be removed.
2. The Step-by-Step Removal Process
The removal process is straightforward, but it requires firm, steady pressure. Because the metal cap is the pump mechanism, it is designed to be tightly sealed.
Step A: Establishing a Secure Grip
You must stabilize the heavy glass bottle before applying force.
Place the bottle on a flat, non-slip surface (like the concrete counter shown in Image 0). Use your non-dominant hand to firmly grip the glass body of the bottle, securing it near the base. Do not hold the cotton labeling or the rope wrap, as these may slip.
Step B: Applying Vertical Pressure
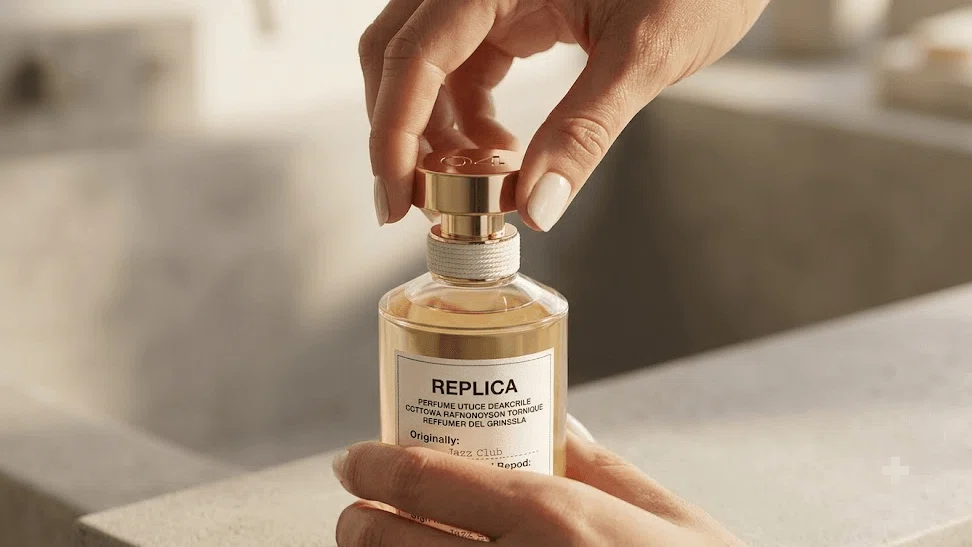
Next, prepare to remove the cap.
As shown in the illustration below, place your dominant hand over the top of the polished gold cap. Use your thumb and index finger to grip the cylindrical sides of the cap securely. Your other fingers can rest lightly on the curve of the bottle’s shoulder for stability. This visualization clearly shows the relationship between the steadying hand (on the glass) and the lifting hand (on the metal cap).
Action: Apply steady, firm upward pressure directly vertically. Do not twist. A slight, gentle rocking motion may help break the initial seal, but the force must be upwards.
3. The Result: The Exposed Atomizer
Step C: The Cap is Removed
When sufficient upward pressure is applied, the friction seal will release. The entire gold mechanism will slide off the central plastic dip tube.
The final image illustrates the successful removal. Note the following details:
- The Components: The polished gold cap assembly (the piece held in Image 1) has been completely removed and is now resting on the concrete surface next to the bottle.
- The Exposed Stem: The bottle’s neck is now open. The white rope wrap remains in place. Emerging from the center of the neck is the thin, translucent plastic dip tube (the primary internal component). Crucially, the internal plastic ferrule (the white plastic ring that seals the neck) is now visible.
The fragrance is now open, and you can decant the liquid using a pipette or travel atomizer.
Important Note: The gold mechanism you removed is the pump. When you are finished, you must align the internal plastic stem with the receiver inside the gold cap and press down firmly and vertically until it clicks securely back into place. Do not twist it back on.